Showing posts with label Spring. Show all posts

SpringWS and Jaxb

Well, truly say this small post is not about how to use SpringWS and Jaxb together. It's more about potential power of this combination. I know, that combination is in release for few years alredy and used by thousands of developers. But this article is more for guys in doubt if they really need SpringWS rather than for experienced Spring WS developers.

First of all, I want to say that Spring WS is very powerful framework. I've noticed it when version 1.0 beta was released. As everything in Spring it has good API, simple implementation model and as result it was very flexible. And this mean that you can easily introduce need changes and extensions without changing Spring WS source code.

From the beginning, the Spring WS team was saying that SpringWS should support not only low-level request processing, when you have some object that represents input XML document or build output XML document, but can use different mapping and translation libraries to make it for you. And here is a place for Jaxb.

To enable marshaling you need just to do few simple changes:

  1. Add marshaller bean of org.springframework.oxm.jaxb.Jaxb2Marshaller type:
    <bean id="marshaller" class="org.springframework.oxm.jaxb.Jaxb2Marshaller">
    <property name="classesToBeBound">
    <list>
    <value>GetImageRequest</value>
    <value>GetImageResponse</value>
    <value>AddImageRequest</value>
    <value>AddImageResponse</value>
    </list>
    </property>
    </bean>

  2. Add Marshaling Method Endpoint Adapter to yours spring.xml:
    <bean class="org.springframework.ws.server.endpoint.adapter.GenericMarshallingMethodEndpointAdapter">
    <property name="marshaller" ref="marshaller"/>
    <property name="unmarshaller" ref="marshaller"/>
    </bean>

  3. Well, that's all :)

And then, after some testing, I found that it would be nice to trim input text fields and do other post-marshalling operations. And I was sure there was a normal way to do that with rather Spring WS or Jaxb. After a few minutes of searching, I have found the way and had completely working code that was doing what I was needed.

The catch is that Jaxb Unmarshaller supports listeners and Spring's Jaxb2Marshaller has a property unmarshallerListener, that points your listener to Unmarshaller's listeners.
With only 3 lines of configuration we have own listener called on each unmarshalling:
<bean id="marshaller" class="org.springframework.oxm.jaxb.Jaxb2Marshaller">
....
<property name="unmarshallerListener">
<bean class="TargetHandlerUnmarshallerListener"/>
</property>
</bean>

Here is TargetHandlerUnmarshallerListener code:
import javax.xml.bind.Unmarshaller;

public class TargetHandlerUnmarshallerListener extends Unmarshaller.Listener {

@Override public void afterUnmarshal(Object target, Object parent) {
super.afterUnmarshal(target, parent);

if (target instanceof PostPopulatedHandler) {
((PostPopulatedHandler) target).postPopulated();
}
}
}

In this class I override only afterUnmarshal() method, that is called after XML is transformed to the Java object. You can also override beforeUnmarshal() method if you need.

PostPopulatedHandler is my own interface that expose only postPopulated() method. Each class knows what to do after unmarshalling, and declares it in the postPopulated() method. Of course, there can be used some annotation, but interface option is the most simple, easier and obvious way.

So, some summary is next: Spring libraries are awesome, because they always provide very good API and you always can do what you need without changing library source code. Jaxb is awesome as well. I'm noticing this, because it's always hard to write good API, especially in multifunctional libraries.
Spring MVC and RESTful web service.

This article is a result of my experience on building small RESTful web service using SpringMVC 2.5. Web service is simple, it supports only few operations, most of them just retrieves data and sends back it in XML.

Well, the task is simple enough:

  1. build secured web service for mostly getting and sometimes posting data;
  2. REST interface is required
    • but SOAP could be added later (I think that if you build SOAP web service you should wait that you'll need to provide REST API for this web service too and vise versa).

As web service is build with REST philosophy, than we need to support processing of GET, POST (well, for me it's enough) requests and return data as XML or JSON. Spring MVC as well others REST web service frameworks and API help with this too. So, what's next?

As application is build with Spring 2.5, it was the best to have some framework for building REST web service easily and easily to integrate it with Spring. Not a secret, that Spring MVC integrates with Spring better that any other web framework or REST web service framework (hm, maybe it's because it is build on Spring). Well, this is cons for using Spring MVC and it is good, but truly - this not enough yet.

Yet one requirement: SOAP web service could be added later. And if it could be added than (in most cases) it will be added. This is important, very important, because we want to build easy-to-extend software. And in case of SOAP WS I prefer to use Spring WS, that is well integrated with Spring MVC. Need also to take into consideration that some REST web service frameworks hardly integrates with Spring MVC or wanted to process all requests. That is a great pros for using Spring MVC.

You may understand what I'm implying. Yes, Spring MVC will be used to build RESTful web service.

Architecture


The main goals of architecture are:

  • be scalable (not to much, but enough to process thousands of requests per hour)
  • be extendable (SOAP must be easy to add)
  • do what is required and nothing more


Next decisions were made:

  • request should be stateless
  • each request should be processed as quick as possible
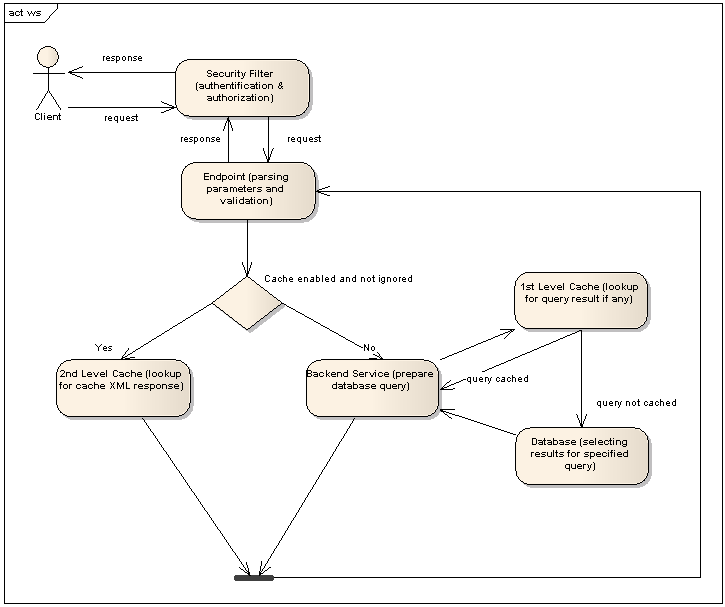
  • there will be 2 levels of caching: one cache for entities and queries (used by web service backend service), and another cache for rendered XML response (used by web service endpoint).
  • everything that could be changed is configured through simple XML configuration (i.e. cache configuration, security configuration, business logic configuration etc.)


The main result of made decisions & rules is request processing lifecycle, that consists of next few phases:

  1. Authentification & Authorization (security filter)
  2. Getting request parameters. Web service endpoint (in our case it is SpringMVC controller) parses request parameters and validates them.
  3. If everything is okay than it tries to get XML response from cache and sends it as response to the client. This step is optional and is processed only if cache is enabled and client does not specify request as such that ignores cache.
  4. Endpoint determines the appropriate WebService backend service and run it and get results.
  5. Endpoint converts results into XML, prepare response and stores it at cache (if cache is enabled). After the XML response is send back to client.


So, if the request response is cached in 2nd or 1st cache levels, than response will be generated without hitting database. In my development environment caching helps to increase performance up to 1500%. In production this number is less - just 300-500%. Still these is very well.

This lifecycle helps to build a scheme of responsibilities and modules. Later each responsibility could be processed by own server or a set of servers.


Simple implemenation


Spring 2.5 gave us possibility to use annotations as for declaring services as for declaring SpringMVC controllers. Spring's annotations Controller, RequestMapping, RequestParam and flexible politic on request handle method parameters gives us brilliant instrument for building web service endpoint.
Ofcourse, hardcoding of URLs in annotations looks as not the best way for building flexible and configurable application. But, this is quite pardonable, because we will use UrlRewriteFilter. UrlRewriteFilter is very useful tool, as it will helps to rewrite URLs, get parameters from URL and do other interesting things. But for our the most important are next 2 features:

  1. flexibility while mapping external URLs (used by users) to internal URLS (processed by endpoint controllers)
  2. possibility to catch parameters from URL, e.g. http://example.com/book/edit/12 ->
    http://exampl.com/book/edit?boodId=12 etc.


Lets look how we could use this features:
Let we have RESTful web service that returns XML with information with specified by id book. Web service clients could get this information by requesting url
http://ourservice.com/ws/rest/book/{bookId} (e.g. http://ourservice.com/ws/rest/book/12). Our application should handle this call and the information about book wit specified id.

Here is our web service controller:

@Controller
public class WebServiceEndpoint {

@Autowired
private BookService bookService;

@RequestMapping(value = "webservice/book", methods = RequestMethod.GET)
public ModelAndView getBook(@RequestParam(name="bookID", required=true)int bookId, Map<String, Object> model) {
model.put("book", bookService.getBookById(bookId));
return new ModelAndView("template/ws/bookInfo", model);
}
}

Code is very simple, but it's good as for sample.

So, we have controller that processes all GET requests for 'webservice/book' resource, that should have request parameter of type integer with name 'bookID'. Endpoint just call backend service, gets information about book, put it to model map and return the ModelAndView instance with simple template that will be rendered and returned to client.

This endpoint controller can't be default process web service request. To redirect web service client request to our endpoint we will use UrlRewriteFilter

<rule>
<from>^/ws/rest/book/[0-9]+$</from>
<to>/webservice/book?bookID=$1</to>
</rule>


so request for resource http://ourservice.com/ws/rest/book/12 will be rewrited by filter to http://ourservice.com/webservice/book?bookID=12.


That's about all for now. The story looks to long. Most of us do not have enough time to read long articles :)


Spring MVC + FreeMarker + Tiles 2

This is extended and translated into English version of my post Spring MVC + FreeMarker + Tiles 2. I've found that many are interested about the joint work of those frameworks.
Well, this article shows how to configure the Spring MVC application with Tiles 2 and FreeMarker. You may don't use the SpringMVC framework, and in this case you need to make by your hands all the configuration work that Spring MVC does for you.
As you may know, Freemarker is popular template engine write on Java and used by mostly by Java applications. Tiles 2 is also Java frameworks used to prepare document using one or more "tiles" - the parts that are defined separately but used to be generated at one document. For example, using tiles you can define site header/footer, news or post blocks at your site etc.
So, how did I get it working?
Simple!

In file web.xml add the freemarker configuration.

<servlet>
<servlet-name>pages</servlet-name>
<servlet-class>org.springframework.web.servlet.DispatcherServlet</servlet-class>
</servlet>

<servlet-mapping>
<servlet-name>pages</servlet-name>
<url-pattern>*.page</url-pattern>
</servlet-mapping>

<servlet>
<servlet-name>freemarker</servlet-name>
<servlet-class>freemarker.ext.servlet.FreemarkerServlet</servlet-class>

<init-param>
<param-name>TemplatePath</param-name>
<param-value>/</param-value>
</init-param>
<init-param>
<param-name>NoCache</param-name>
<param-value>true</param-value>
</init-param>
<init-paramv
<param-name>ContentType</param-name>
<param-value>text/html</param-value>
</init-param>

....

<load-on-startup>1</load-on-startup>
</servlet>

<servlet-mapping>
<servlet-name>freemarker</servlet-name>
<url-pattern>*.ftl</url-pattern>
</servlet-mapping>


And here is the important part *-servlet.xml configuration:

<!-- Tiles 2 configuration-->
<bean id="tilesConfigurer" class="org.springframework.web.servlet.view.tiles2.TilesConfigurer">
<property name="definitions">
<list>
<!-- the tiles configuration files are declared here -->
<value>/WEB-INF/defs/general.xml</value>
<value>/WEB-INF/defs/secure.xml</value>
</list>
</property>
</bean>

<bean id="tilesViewResolver" class="com.javaua.spring.integration.ext.ExtUrlBasedViewResolver">
<property name="viewClass" value="com.javaua.spring.integration.ext.ExtTilesView"/>
<property name="exposeSpringMacroModel" value="true"/>
</bean>

<bean id="viewResolver" class="org.springframework.web.servlet.view.freemarker.FreeMarkerViewResolver">
<property name="cache" value="true"/>
<property name="prefix" value=""/>
<property name="suffix" value=".ftl"/>
<!-- if you want to use the Spring FreeMarker macros, set this property to true -->
<property name="exposeSpringMacroHelpers" value="true"/>
</bean>

<!-- Controller that returns view = /layout/header -->
<bean name="/layout/header.page" class="com.javaua.HeaderController"/>


Also show here the part of general.xml file where Tiles definitions are set up.:

<definition name="home" extends="default">
<put-attribute name="title" value="Home Page"/>
<put-attribute name="body" value="/templates/home.ftl"/>
</definition>
<definition name="default" template="/templates/main.ftl">
<put-attribute name="header" value="/layout/header.page"/>
<put-attribute name="footer" value="/templates/layout/footer.ftl"/>
</definition>
<definition name="/layout/header" template="/templates/layout/header.ftl"/>


Source code of com.javaua.spring.integration.ext.ExtUrlBasedViewResolver class:

import org.springframework.core.Ordered;
import org.springframework.web.servlet.View;
import org.springframework.web.servlet.view.AbstractUrlBasedView;
import org.springframework.web.servlet.view.UrlBasedViewResolver;

public class ExtUrlBasedViewResolver extends UrlBasedViewResolver implements Ordered {

private boolean exposeSpringMacroModel = false;

public void setExposeSpringMacroModel(boolean exposeSpringMacroModel) {
this.exposeSpringMacroModel = exposeSpringMacroModel;
}

protected View loadView(String viewName, Locale locale) throws Exception {
AbstractUrlBasedView view = buildView(viewName);
View viewObj = (View) getApplicationContext().getAutowireCapableBeanFactory().initializeBean(view, viewName);

if (viewObj instanceof ExtTilesView) {
ExtTilesView tilesView = (ExtTilesView) viewObj;
tilesView.setExposeSpringMacroModel(exposeSpringMacroModel);
}

return viewObj;
}


Source code of com.javaua.spring.integration.ext.ExtTilesView class:

import org.springframework.web.servlet.view.tiles2.TilesView;
import org.springframework.web.servlet.view.AbstractTemplateView;
import org.springframework.web.servlet.support.RequestContext;

import javax.servlet.http.HttpServletResponse;
import javax.servlet.http.HttpServletRequest;
import javax.servlet.ServletException;
import java.util.Map;


public class ExtTilesView extends TilesView {

private boolean exposeSpringMacroModel = false;

public void setExposeSpringMacroModel(boolean exposeSpringMacroModel) {
this.exposeSpringMacroModel = exposeSpringMacroModel;
}

@SuppressWarnings("unchecked")
protected final void renderMergedOutputModel(Map model, HttpServletRequest request,
HttpServletResponse response) throws Exception {

if (exposeSpringMacroModel) {
if (model.containsKey(AbstractTemplateView.SPRING_MACRO_REQUEST_CONTEXT_ATTRIBUTE)) {
throw new ServletException(
"Cannot expose bind macro helper '" +
AbstractTemplateView.SPRING_MACRO_REQUEST_CONTEXT_ATTRIBUTE +
"' because of an existing model object of the same name");
}
model.put(AbstractTemplateView.SPRING_MACRO_REQUEST_CONTEXT_ATTRIBUTE,
new RequestContext(request, getServletContext(), model));
}

super.renderMergedOutputModel(model, request, response);
}
}


Why we need those two classes? Simple enough. Class ExtTilesView exposes Spring macro model which is required when using standard macros used to support work with Freemarker and Velocity typelate frameworks. And the class ExtUrlBasedViewResolver helps us to prevent view-not-found-error. Because, standard UrlBasedViewResolver is used for getting tiles view, it will throw an error when view with specified name is not found. In my case, I have two view resolvers and each will throw an error if view can't be found.
And FreeMarkerViewResolver will request for the file, while tiles requests just for XML definition. That's why I've ran the tiles view resolver as first one.


Spring MVC + FreeMarker + Tiles 2

Може комусь і знадобиться ще. Тут описується як прикрутити Spring MVC та FreeMarker та Tiles 2 так, щоб вони жили та працювали разом.
Задача: Tiles2 повинен організовувати шаблони створені на основі FreeMarker (хоча можна і не тільки FreeMarker, можна поєднувати). Для того, щоб досягнути це необхідно виконати декотру конфігурацію. У файлі web.xml

<servlet>
<servlet-name>pages</servlet-name>
<servlet-class>org.springframework.web.servlet.DispatcherServlet</servlet-class>
</servlet>

<servlet-mapping>
<servlet-name>pages</servlet-name>
<url-pattern>*.page</url-pattern>
</servlet-mapping>

<servlet>
<servlet-name>freemarker</servlet-name>
<servlet-class>freemarker.ext.servlet.FreemarkerServlet</servlet-class>

<init-param>
<param-name>TemplatePath</param-name>
<param-value>/</param-value>
</init-param>
<init-param>
<param-name>NoCache</param-name>
<param-value>true</param-value>
</init-param>
<init-paramv
<param-name>ContentType</param-name>
<param-value>text/html</param-value>
</init-param>

....

<load-on-startup>1</load-on-startup>
</servlet>

<servlet-mapping>
<servlet-name>freemarker</servlet-name>
<url-pattern>*.ftl</url-pattern>
</servlet-mapping>

А тепер конфігурація pages-servlet.xml:

<!-- Конфігурація Tiles -->
<bean id="tilesConfigurer" class="org.springframework.web.servlet.view.tiles2.TilesConfigurer">
<property name="definitions">
<list>
<value>/WEB-INF/defs/general.xml</value>
<value>/WEB-INF/defs/secure.xml</value>
</list>
</property>
</bean>

<bean id="viewResolver" class="org.springframework.web.servlet.view.UrlBasedViewResolver">
<property name="viewClass" value="org.springframework.web.servlet.view.tiles2.TilesView"/>
</bean>

<!-- Контролер повертає view = /layout/header -->
<bean name="/layout/header.page" class="au.com.at2.web.spring.HeaderController"/>

Частина файла general.xml, в якому описуються оголошення Tiles:

<definition name="home" extends="default">
<put-attribute name="title" value="Home Page"/>
<put-attribute name="body" value="/templates/home.ftl"/>
</definition>
<definition name="default" template="/templates/main.ftl">
<put-attribute name="header" value="/layout/header.page"/>
<put-attribute name="footer" value="/templates/layout/footer.ftl"/>
</definition>
<definition name="/layout/header" template="/templates/layout/header.ftl"/>

Невеличке пояснення:
Спочатку добавив новий сервлет для FreeMarker'а. Всі шаблони в мене наразі стоять в каталозі templates, в той час, як TemplatePath для FreeMarker'а - це /. Я це зробив собі на майбутнє - для добавлення нових каталогів крім templates, - адже аплікація має розширюватися (вони завжди розширюються).
В pages-servlet.xml добавив bean tilesConfigurer, який будує конфігурацію для Tiles. Оголошення же знаходяться у файлах /WEB-INF/defs/general.xml, /WEB-INF/defs/secure.xml. При конфігурації інформація із них мерджеться, отже, оголошення default є доступним і в межах secure.xml.


<put-attribute name="header" value="/layout/header.page"/>

Цей кусок значить - можна використовувати як тайл і сторінку, що обробляється DispatcherServlet, таким чинном, ми можемо мати окремі контролери для окреми тайлів. І це правильно. Без цього би було туго. Контролер au.com.at2.web.spring.HeaderController повертає view /layout/header, який оголошений як definition в general.xml.

Реліз Spring WebFlow 2.0

15 травня, Spring Framework анонсувала вихід в реліз WebFlow версії 2.0. Серед проголошених основних фіч - це "першокласна" підтримка Java Server Faces (Spring Faces), AJAX (Spring JavaScript).

Spring WebFlow використовується як доповнення до вже існуючих веб-фреймворків (наприклад, Spring MVC, JSF).
Даний фреймворк дозволяє представити веб аплікацію у вигляді flow'ів, кожен з яких містить набір станів та переходів між станами. Кожний такий flow можна уявити собі вигляді діаграми станів UML. Практично, діаграма станів використовується для того, щоб графічно змоделювати або показати набір станів в межах flow. Це є прекрасний спосіб вирішення навігації та роботи із станами в межах веб аплікації.

Spring 2.5: використання аннотацій

Про те, що вийшов Spring Framework (www.springframework.org) версії 2.5, я знав вже давно (відносно давно звичайно). Читав про нові можливості даної версії, пробував навіть щось трохи. Але то все було просто так, для себе. Недавно появилася можливість побавитися із Spring 2.5 більш глибше. І я з радістю нею скористався.
Основним моментом, який був для мене цікавим - це використання анотацій у доповнення до XML конфігурації. Саме про це я вирішив трохи написати.

Головним питанням було -- навіщо анотації?
Іншими цікавими питаннями були:
  1. які анотації можна використовувати?
  2. як їх використовувати?
  3. чи можливо працювати і дальше без них?
  4. як можна включати і виключати використання анотацій?
і багато ще інших питань, які виникали по ходу справи.

Отож, про все по порядку.
Анотації не підтримуються по замовчуванню. Для того, щоб їх використовувати, потрібно вказати Spring, що ви хочете працювати і з ними тоже. Для цьому слід добавити у ваш spring.xml наступний рядок:

<context:annotation-config/>.

Namespace context підключається так

xmlns:context="http://www.springframework.org/schema/context"
xsi:schemaLocation=" http://www.springframework.org/schema/context
http://www.springframework.org/schema/context/spring-context-2.5.xsd"

Після цього, в нас появляється можливість використовувати анотації.
А тепер детальніше про самі анотанції. Так ми вже можемо використовувати їх, але які вони є, навіщо вони використовуються?
Найбільш поширеною видається анотації @Autowired. Дана анотація, вказує що в контейнер Spring повинен виконати автоматичне встановлення значення. Дану анотацію можна використовувати для автоматичного встановлення значення в конструкторі, для поля класу, для сеттера. Наприклад:

public class DocumentManager {
@Autowired
private DocumentFinder documentFinder;
private DocumentDao documentDao;
private Document documentPrototype;

@Autowired
public DocumentManager(DocumentDao documentDao) {
this.documentDao = documentDao;
}

@Autowired
public void setPrototype(Document document) {
documentPrototype = prototype;
}
}

В даному випадку автозаповнення за допомогою анотації @Autowired, Spring буде виконувати на основі типів полів чи аргументів. Але виникає проблема, коли, наприклад, у вас може бути більше одного біна із типом DocumentFinder або Document. Що робити тоді, як Spring має знати яке саме значення слід вставити в певне поле? І саме тут вступає у гру анотація @Qualifier.
Анотація @Qualifier дозволяє вказати, який саме container-managed bean використовувати як значення для заповнення. Дану анотацію можна використовувати як для полів класу, так і для параметрів конструктора або інших методів, так само і для сеттерів. Назва біна, який повинен бути вставленим як значення поля чи параметра вказується як value анотації @Qualifier. Доволі просто і зручно, самі подивіться на код:

public class DocumentManager {

@Autowired
@Qualifier("defaultDocumentFinder")
private DocumentFinder documentFinder;

private DocumentDao documentDao;

private Document documentPrototype;

@Autowired
public DocumentManager(@Qualifier("hibernateDocumentDao")DocumentDao documentDao) {
this.documentDao = documentDao;
}

@Autowired
public void setPrototype(@Qualifier("prototypeDocument")Document document) {
documentPrototype = prototype;
}
}

Доречі, Spring дозволяє за допомогою XML вказати явно, який qualifier у певного bean. Для цього використовується піделемент <qualifier> елемента <bean>. Він має такі атрибути, як:
- type - тип анотації, що використовується (про це пізніше)
- value - це значення унікальне для даного біна.

Наприклад, якщо в коді вказано:
  
@Autowired
@Qualifier("prototypeDocument")
public void setPrototype(Document document) {
documentPrototype = prototype;
}

, то в XML

<bean class="Document">
<qualifier value="prototypeDocument"/>
</bean>

<bean class="Document">
<qualifier value="privateDocument"/>
</bean>

І як ви вже певно зрозуміли, при автозаповнення буде використаний перший bean, тому що його qualifier value є prototypeDocument.

Але це ще не всі можливості, які надає Spring у питанні вирішення, який саме bean повинен бути використаний для автозаповнення. Так, наприклад, ви можете створювати власні анотації, які використовувати замість @Qualifier.
Наприклад:

@Target({ElementType.FIELD, ElementType.PARAMETER})
@Retention(RetentionPolicy.RUNTIME)
@Qualifier
public @interface DocumentFinder {
String documentType();
String finderScope();
}

тоді

@Autowired
@DocumentFinder(documentType="MSWord", finderScope="local")
private DocumentFinder documentFinder;
а в XML

<bean class="DocumentFinder">
<qualifier type="annotation.DocumentFinder">
<attribute name="documentType" value="MSWord"/>
<attribute name="finderScope" value="local"/>
</qualifier>
</bean>

І це ще навіть не всі можливості...
Так, наприклад, я не розказав про @Resource. А також і не згадав досі про можливість використання компонентів, які оголошенні за допомогою анотацій.

Але про це все або читайте в туторіалі від Spring або вже у наступній статті.